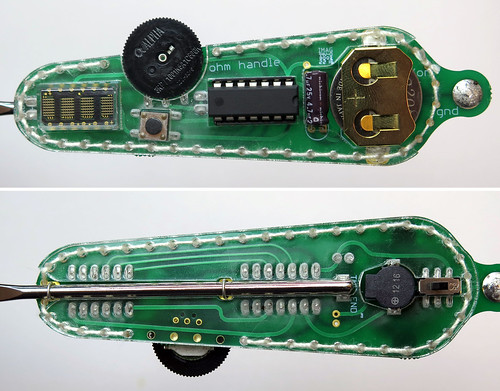
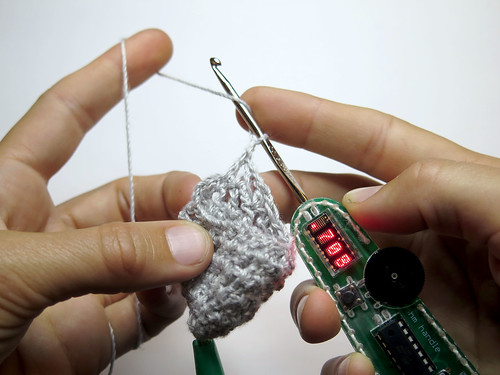
The ohmHook is crochet hook mounted on a circuitboard which measures the electrical resistance between the crochet hook and a crocodile clip connected to the opposite end of the tool handle. The resistance is displayed as the 10 bit reading of the microcontroller’s analog-to-digital converter.
Having the ability to sense electrical properties of a material as you are manipulating it can allow you to explore it’s potential for creating electronics. Highly conductive materials make good connectors between physically distant electronic parts. Materials with stable electrical resistance can be used to detect location of contact on their surface. Materials with varirable resistance often respond to forces such as stretch, pressure, bend and twist with a change in resistance, and can be used to sense a large variety of physical interactions.
The ohmHook does not have to be used for crochet. Use it to probe and explore all kinds of materials, and to invent new ways of building electronics.


Attention! There is one big mistake in the design that I need to change in a next version.
when the potentiometer is turned all the way down to 0 ohm and you touch the probes (hook and alligator clip) directly together (with no resistance in between) you are creating a short circuit between +3V and -GND. The heat of this short circuit can be strong enough to burn the resistive track inside the potentiometer. One way to solve this would be to use a potentiometer that does not go all the way down to 0 ohm. Or to add another small 100 ohm resistor in series with the potentiometer…
Photos:
Photos (version 1) >> https://www.flickr.com/photos/plusea/sets/72157664482745526
Photos (version 2) >> https://www.flickr.com/photos/plusea/sets/72157664860355161
Links:
>> ohmHook Booklet
>> ohmHook DIY Page
>> ohmHook Project Page
>> ohmHook Workshop Documentation
>> ohmHook Repository
Materials and Tools
Circuit Diagram
HCMS-29xx datasheet >> http://www.avagotech.com/docs/AV02-0868EN
ATtiny84 datasheet >> http://www.atmel.com/Images/8006S.pdf
Slider datasheet >> http://www.mouser.com/ds/2/54/tl-777483.pdf
ATtiny Programming
Using ATtiny programmer with Arduino 1.6:
Install ATtiny files >> http://highlowtech.org/?p=1695
Install ATtiny driver (windows only) >> http://highlowtech.org/?p=1801
Code
Download library >> http://www.pjrc.com/teensy/td_libs_LedDisplay.html
Close Arduino
Edit .h file >> https://forum.arduino.cc/index.php?topic=394297.0
Open Arduino
ohmHook – measuring and manipulting resistance by hand
for the E-Textile Tooling workshop at Eyeo 2016
>> www.github.com/plusea/ohmHook
displays an analog value on an Avago HCMS-39xx display controlled by ATtiny84
original HCMS-39xx display code by Tom Igoe, created 12 June 2008
modified by Hannah Perner-Wilson Apr 2016
*/
#include
// Define pins for the LED display:
#define dataPin 1 // connects to the display’s data in
#define registerSelect 2 // the display’s register select pin
#define clockPin 3 // the display’s clock pin
#define enable 8 // the display’s chip enable pin
#define reset 9 // the display’s reset pin
#define displayLength 4 // number of characters in the display
LedDisplay myDisplay = LedDisplay(dataPin, registerSelect, clockPin, enable, reset, displayLength); // create am instance of the LED display library:
float brightness = 15; // screen brightness
#define buttonPin 5
#define potMinus 6
#define analogPin 7
#define speakerPin 10
int buttonState = 0; // variable for reading the button status
int lastButtonState = 0; // stores the previous state of the button
int mode = 0; // mode will store the current blinking mode (0 – 3)
int myDirection = 1; // direction of scrolling. -1 = left, 1 = right.
int analogValue;
float resistanceValue;
float soundValue;
void setup() {
pinMode(buttonPin, INPUT_PULLUP);
pinMode(analogPin, INPUT);
pinMode(potMinus, OUTPUT);
digitalWrite(potMinus, LOW);
pinMode(speakerPin, OUTPUT);
delay(500);
noise(speakerPin, 100, 200);
noise(speakerPin, 20000, 200);
delay(10);
myDisplay.begin(); // initialize the display library:
myDisplay.setBrightness(brightness); // set the brightness of the display:
myDisplay.clear();
}
void loop() {
// BUTTON //
buttonState = digitalRead(buttonPin); // read the state of the pushbutton
// detect the event of the button going from pressed to not pressed,
// and increment the animation mode when this is detected
if (lastButtonState == HIGH && buttonState == LOW) {
mode = mode + 1;
}
lastButtonState = buttonState; // store current button state as the last button state to use next time through loop()
if (mode > 8) mode = 0;
///// MODE: ANALOG READ /////
if (mode == 0) {
pinMode(potMinus, INPUT);
mode = 1;
}
if (mode == 1) {
analogValue = analogRead(analogPin);
delay(10);
// DISPLAY //
myDisplay.setCursor(0); // set the cursor to 1:
if (analogValue < 1000 && analogValue > 99) myDisplay.print(” “);
if (analogValue < 100 && analogValue > 9) myDisplay.print(” “);
if (analogValue < 10) myDisplay.print(" ");
myDisplay.print(analogValue, DEC);
}
///// MODE: SYNTH /////
if (mode == 2) {
myDisplay.setCursor(0); // set the cursor to 1:
myDisplay.print("SYNT");
mode = 3;
}
if (mode == 3) {
analogValue = analogRead(analogPin);
if(analogValue < 1010){
soundValue = map(analogValue, 0, 1023, 0, 20000);
noise(speakerPin, soundValue, 1);
}
}
///// MODE: POT RESISTANCE VALUE /////
if (mode == 4) {
// READ POT //
pinMode(potMinus, OUTPUT);
digitalWrite(potMinus, LOW);
mode = 5;
}
if (mode == 5) {
analogValue = analogRead(analogPin);
delay(10);
resistanceValue = map(analogValue, 1023, 0, 0, 500000);
// DISPLAY //
myDisplay.setCursor(0); // set the cursor to 1
//myDisplay.print(analogValue, DEC);
if (resistanceValue >= 450000 && resistanceValue < 500000) myDisplay.print("500K");
if (resistanceValue >= 400000 && resistanceValue < 450000) myDisplay.print("450K");
if (resistanceValue >= 350000 && resistanceValue < 400000) myDisplay.print("400K");
if (resistanceValue >= 300000 && resistanceValue < 350000) myDisplay.print("350K");
if (resistanceValue >= 250000 && resistanceValue < 300000) myDisplay.print("300K");
if (resistanceValue >= 200000 && resistanceValue < 250000) myDisplay.print("250K");
if (resistanceValue >= 100000 && resistanceValue < 200000) myDisplay.print("200K");
if (resistanceValue >= 50000 && resistanceValue < 100000) myDisplay.print("100K");
if (resistanceValue >= 40000 && resistanceValue < 50000) myDisplay.print(" 50K");
if (resistanceValue >= 30000 && resistanceValue < 40000) myDisplay.print(" 40K");
if (resistanceValue >= 20000 && resistanceValue < 30000) myDisplay.print(" 30K");
if (resistanceValue >= 10000 && resistanceValue < 20000) myDisplay.print(" 20K");
if (resistanceValue >= 5000 && resistanceValue < 10000) myDisplay.print(" 10K");
if (resistanceValue >= 1000 && resistanceValue < 5000) myDisplay.print(" 5K");
if (resistanceValue >= 500 && resistanceValue < 1000) myDisplay.print(" 1K");
if (resistanceValue >= 100 && resistanceValue < 500) myDisplay.print(" 500");
if (resistanceValue >= 0 && resistanceValue < 100) myDisplay.print("<100");
}
///// MODE: BRIGHTNESS /////
if (mode == 6) {
brightness = map(analogRead(analogPin), 0, 1023, 1, 15);
delay(10);
brightness = constrain(brightness, 1, 15);
myDisplay.setCursor(0); // set the cursor to 1:
myDisplay.setBrightness(brightness); // set the brightness of the display
//myDisplay.print(brightness, DEC);
myDisplay.print("LITE");
}
///// MODE: JOKES /////
if (mode == 7) {
myDisplay.clear();
myDisplay.setCursor(0);
myDisplay.setString("resistance smells funny!");
mode = 8;
}
if (mode == 8) {
if ((myDisplay.getCursor() > displayLength) ||
(myDisplay.getCursor() <= -(myDisplay.stringLength()))) {
myDirection = -myDirection;
delay(500);
}
myDisplay.scroll(myDirection);
delay(100);
}
}
void noise (unsigned char noisePin, int frequencyInHertz, long timeInMilliseconds) {
int x;
long delayAmount = (long)(1000000 / frequencyInHertz);
long loopTime = (long)((timeInMilliseconds * 1000) / (delayAmount * 2));
for (x = 0; x < loopTime; x++)
{
digitalWrite(noisePin, HIGH);
delayMicroseconds(delayAmount);
digitalWrite(noisePin, LOW);
delayMicroseconds(delayAmount);
}
}
Improvements for a Next Version
– shift cap closer to microcontroller
– connect holes for tip hook loop to probe pin
– clean up silkscreen
– add on/off markings to back
Photos
Flickr set >> https://www.flickr.com/photos/plusea/albums/72157664860355161


Leave a comment