Example Projects
Workshops
Announcements
Actuators
Connections
Power
Sensors
Traces

Circuits and Code Wireless

Meet the Materials
Conductive Materials
Non-Conductive Materials
Tools
Techniques
Thinking Out Loud
Example Projects
  • Action Figure Motion-Capture
  • Alpaca T-Shirt Hack
  • Aluminum Foil Tilt Sensor
  • Amplified Pillow Speaker
  • Sockpuppets
  • ATtiny Snap Diamond
  • ATtiny Drawdio Bracelet
  • ATTINY POV
  • Bela + Blanket
  • Bend Sensor Glove
  • Breathing Belt
  • Corset Breathing Sensor
  • Data Logging Broach
  • Datagloves Overview
  • DIY Arduino Data Gloves
  • DJ Hoodie
  • DressCode Dress Shirt
  • DressCode Examples
  • DressCode Necklace
  • DressCode Vest
  • E-Textile Datagloves Overview
  • E-Textile Sensor Wall
  • Eeontex Projects
  • Example Circuits and Code
  • Fab Intro: Continuity Bracelet
  • Fabric JoyPad
  • Frequency Finger Gloves
  • glovephone
  • Granny Square MIDI
  • Grias Di Hut
  • Jenny’s Playlist Costume
  • JoySlippers
  • Jumpsuit for actionman
  • Interactive KnitBook
  • lulu masks
  • Lulu optic fiber swatches
  • Massage my feet
  • Mouse in a Hole
  • Multiplexed Pillow
  • Musical Pillow
  • My Segments Display
  • Necklace Display - Beaded LED Matrix
  • Neoprene LED Light Pouch
  • Openwear Finger Bend Sensor
  • Penguin Control
  • Piano T-Shirt
  • Capacitive LED Fower
  • Puppeteer Costume
  • Puppeteer Gloves
  • Safetypin Dataglove
  • Sensitive Fingertips
  • Sensor Sleeve
  • Silent Pillow Speaker
  • soft walk socks
  • Solar T-Shirt
  • Solar T-shirt II
  • Sonic Insoles for Magic Shoes
  • Star Light
  • Stretch Sensitive Bracelet
  • Stirring Queen Mask
  • Textile Sensor Demo Station
  • Tie-Poly Leggings and Dataglove
  • Tilt Sensing Bracelet
  • Tilt Sensor Demo
  • Time Sensing Bracelet
  • Touch Sensitive Glove
  • TrafoPop LED Jacket
  • Wearable Sound Experiment
  • Wearable Toy Piano
  • Wearable Waste of Energy
  • Wireless JoySlippers
  • Wireless Tilt Sensing Bracelet
  • Support the creation of content on this website through PATREON!
  • About
  • E-Textile Events
  • E-Textile Spaces
  • Newsletter
  • Print & Publications
  • E-Textile Shopping

  • SEARCH
    Content by Mika Satomi and Hannah Perner-Wilson
    E-Textile Tailor Shop by KOBAKANT
    The following institutions have funded our research and supported our work:

    Since 2020, Hannah is guest professor of the Spiel&&Objekt Master's program at the University of Performing Arts Ernst Busch in Berlin

    From 2013-2015 Mika was a guest professor at the eLab at Kunsthochschule Berlin-Weissensee

    From July - December 2013 Hannah was a researcher at the UdK's Design Research Lab

    From 2010-2012 Mika was a guest researcher in the Smart Textiles Design Lab at The Swedish School of Textiles

    From 2009 - 2011 Hannah was a graduate student in the MIT Media Lab's High-Low Tech research group led by Leah Buechley


    In 2009 Hannah and Mika were both research fellows at the Distance Lab


    Between 2003 - 2009 Hannah and Mika were both students at Interface Cultures
    We support the Open Source Hardware movement. All our own designs published on this website are released under the Free Cultural Works definition
    Example Projects

    Neoprene LED Light Pouch

    This soft LED light pouch is easy to make and runs with two AAA batteries. The design is super simple and fits really well with the LilyPad components. Though you can also modify a regular LED and slide switch to be sewable by soldering little loops on the end of their leads. The light is cute and small and soft but not really bright enough to be used as a headlight for biking so I’d appreciate suggestions as to what else it could be used for.

    >> Instructable


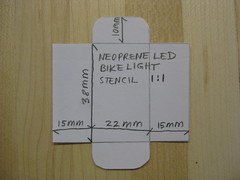
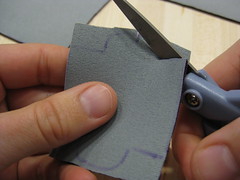
    Trace and cut the stencil
    Copy the stencil depicted in the photographs. The measurements are important so that the pouch will fit tightly around the two AAA batteries and make good electrical contact.
    Using a fabric pen, that will disappear over time. Trance the stencil onto the

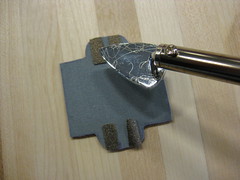
    Iron and fuse conductive fabric
    Adhere the fusible interfacing to one side of the stretch conductive fabric and cut out small rectangles about 0.5 x 1.5 cm in size. Then fuse these to the neoprene (the side which will become the inside) as shown in the photos. Be careful not to use too hot an iron or it will fry the conductive fabric. A slight gold discoloration is normal.

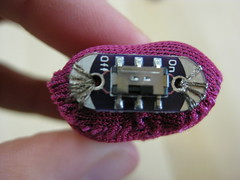
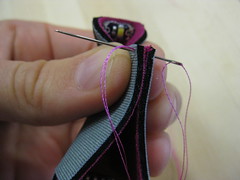
    Sewing components on
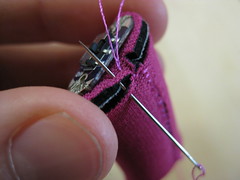
    Thread a needle with conductive thread, taking the thread double. Hold the components in place and sew them on tightly to the side of the neoprene that will be the outside. The conductive thread needs to go all the way through the neoprene and only make contact with the patch of conductive fabric directly behind it. Never making contact with both conductive patches. To ensure good contact sew at least 3-4 times through each hole. Cutting the conductive thread and starting new after each hole. At this point it does not matter which side you put the switch or which the LED and it also does not matter which way around either of these are mounted.

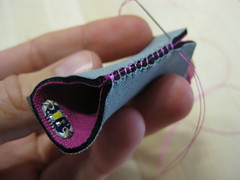
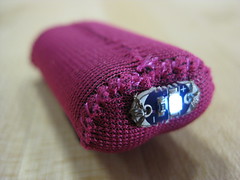
    Sewing neoprene pouch together
    To sew the neoprene pouch together, thread a needle with regular thread, taking it double and start by sewing the two straight sides together as shown in the photos. Then turn the pouch inside out and begin to sew the ends. You can put batteries inside the pouch to make sewing easier. Be sure to put the batteries in the right way around so that their plus and minus match up with the LED plus and minus. When you are finished the batteries will be locked up inside the pouch.

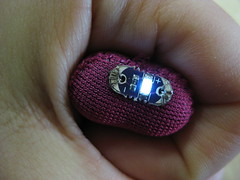
    If all is well then the LED should light up when you flick the switch.

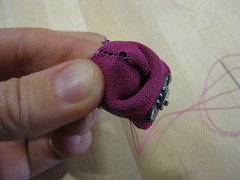
    Freeing the batteries
    To free the batteries simply take a pair of pointy sharp scissors and pierce through the neoprene and then cut a hole about 1-2cm in diameter. It should be possible to remove and replace the batteries through this hole. But don’t cut the hole too big or else the pouch will become too loose and contact between the conductive fabric patches and the battery ends will not be steady.

    Video

    2 Comments so far

    1. […] regulating conductive fabric and thread, a small batteries, and an LED/switch combo to have a small squishy flashlight, and shows you how, […]

    2. […] using conductive fabric and thread, some batteries, and an LED/switch combo to make a little squishy flashlight, and shows you how, […]

    Leave a comment