Example Projects
Workshops
Announcements
Actuators
Connections
Power
Sensors
Traces

Circuits and Code Wireless

Meet the Materials
Conductive Materials
Non-Conductive Materials
Tools
Techniques
Thinking Out Loud
Example Projects
  • Action Figure Motion-Capture
  • Alpaca T-Shirt Hack
  • Aluminum Foil Tilt Sensor
  • Amplified Pillow Speaker
  • Sockpuppets
  • ATtiny Snap Diamond
  • ATtiny Drawdio Bracelet
  • ATTINY POV
  • Bela + Blanket
  • Bend Sensor Glove
  • Breathing Belt
  • Corset Breathing Sensor
  • Data Logging Broach
  • Datagloves Overview
  • DIY Arduino Data Gloves
  • DJ Hoodie
  • DressCode Dress Shirt
  • DressCode Examples
  • DressCode Necklace
  • DressCode Vest
  • E-Textile Datagloves Overview
  • E-Textile Sensor Wall
  • Eeontex Projects
  • Example Circuits and Code
  • Fab Intro: Continuity Bracelet
  • Fabric JoyPad
  • Frequency Finger Gloves
  • glovephone
  • Granny Square MIDI
  • Grias Di Hut
  • Jenny’s Playlist Costume
  • JoySlippers
  • Jumpsuit for actionman
  • Interactive KnitBook
  • lulu masks
  • Lulu optic fiber swatches
  • Massage my feet
  • Mouse in a Hole
  • Multiplexed Pillow
  • Musical Pillow
  • My Segments Display
  • Necklace Display - Beaded LED Matrix
  • Neoprene LED Light Pouch
  • Openwear Finger Bend Sensor
  • Penguin Control
  • Piano T-Shirt
  • Capacitive LED Fower
  • Puppeteer Costume
  • Puppeteer Gloves
  • Safetypin Dataglove
  • Sensitive Fingertips
  • Sensor Sleeve
  • Silent Pillow Speaker
  • soft walk socks
  • Solar T-Shirt
  • Solar T-shirt II
  • Sonic Insoles for Magic Shoes
  • Star Light
  • Stretch Sensitive Bracelet
  • Stirring Queen Mask
  • Textile Sensor Demo Station
  • Tie-Poly Leggings and Dataglove
  • Tilt Sensing Bracelet
  • Tilt Sensor Demo
  • Time Sensing Bracelet
  • Touch Sensitive Glove
  • TrafoPop LED Jacket
  • Wearable Sound Experiment
  • Wearable Toy Piano
  • Wearable Waste of Energy
  • Wireless JoySlippers
  • Wireless Tilt Sensing Bracelet
  • Support the creation of content on this website through PATREON!
  • About
  • E-Textile Events
  • E-Textile Spaces
  • Newsletter
  • Print & Publications
  • E-Textile Shopping

  • SEARCH
    Content by Mika Satomi and Hannah Perner-Wilson
    E-Textile Tailor Shop by KOBAKANT
    The following institutions have funded our research and supported our work:

    Since 2020, Hannah is guest professor of the Spiel&&Objekt Master's program at the University of Performing Arts Ernst Busch in Berlin

    From 2013-2015 Mika was a guest professor at the eLab at Kunsthochschule Berlin-Weissensee

    From July - December 2013 Hannah was a researcher at the UdK's Design Research Lab

    From 2010-2012 Mika was a guest researcher in the Smart Textiles Design Lab at The Swedish School of Textiles

    From 2009 - 2011 Hannah was a graduate student in the MIT Media Lab's High-Low Tech research group led by Leah Buechley


    In 2009 Hannah and Mika were both research fellows at the Distance Lab


    Between 2003 - 2009 Hannah and Mika were both students at Interface Cultures
    We support the Open Source Hardware movement. All our own designs published on this website are released under the Free Cultural Works definition
    Example Projects

    Touch Sensitive Glove

    When conductive yarn is mixed in the knit/crochet piece, it becomes pressure sensitive. This can be implemented as touch sensor or bend sensor.
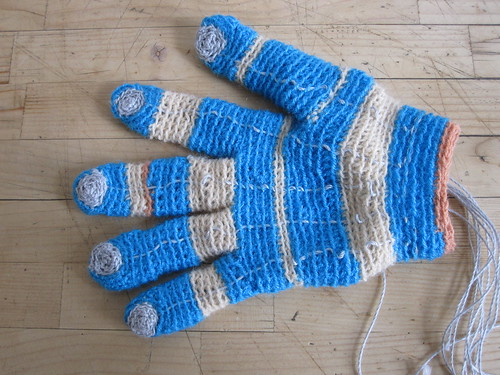
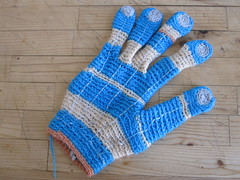
    Here, I have crocheted a glove with conductive yarn (Schoeller Nm 10/3) on finger tips. You can measure the conductivity change as each fingers touches (pressured against) objects.
    This project was a trial to come up with alternative solution for the Sensitive Fingertips project.

    Making of…

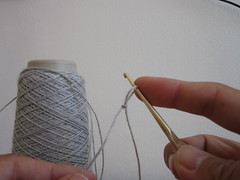
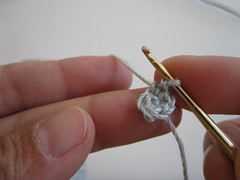
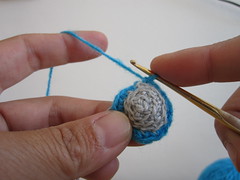
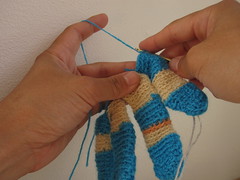
    Start crochet round shape with conductive yarn. I started with 3 loops, connect the end with slip stitch. Continue crochet for 3 or 4 round until it is a size of finger tip.

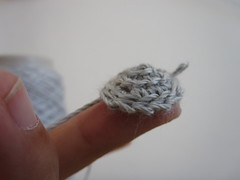
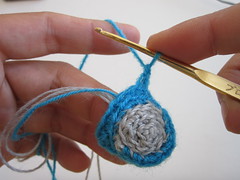
    Once the conductive yarn piece reaches the size of finger tip, change the yarn to normal yarn (make sure to leave enough conductive yarn on both end so you can connect to circuit later). I first made a finger top part, and continued the tube like structure to cover the finger to the bottom. Repeat this process for 5 times. Adjust the size for each fingers.

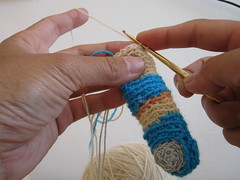
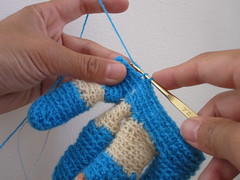
    Now, connect four fingers together by crocheting the edges together. Then continue the connected edge to make the palm part of the glove. When it reaches the level for thumb, add the thumb finger parts you’ve made before and continue until it reaches the wrist. In this example, I crochet all the way, therefor the wrist part is not elastic. If you prefer the elastic edge, you can switch to knitting at the wrist part and use rib stitch to achieve the elasticity.

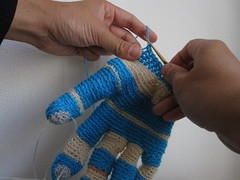
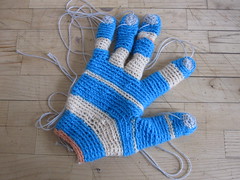
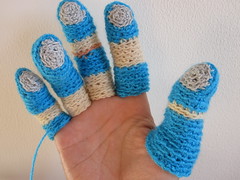
    The both end of the conductive yarns on each fingers are brought to the wrist part of the glove separately to measure the resistance change. (later on, I changed to connect to conductive fabric and thread near the finger tip and brought to the wrist) Notice that conducive yarn (thread) traces are running on each finger, one on palm side and one on back side of the hand. The end of the trace is connected to poppers.

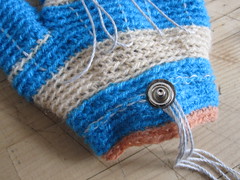
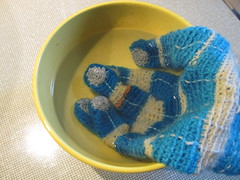
    After finishing the construction, I have felted the glove a bit by putting it into hot water and rubbing it with soap. This made the sensor to go back to original state after pressuring them slightly better. (This process may not be necessary)

    Here is a movie of a finger pressuring test…

    4 Comments so far

    1. Hmmm on September 15th, 2010

      Can you use it to type into a computer by pushing on hard surfaces in chording keyboard patterns?

      http://en.wikipedia.org/wiki/Chorded_keyboard

    2. amok on May 18th, 2011

      this is super!!

    3. Plusea on May 12th, 2012
    4. The Gloves Project on May 5th, 2013

    Leave a comment